
ArcSoft’s flagship software package Portrait+ was the first automatic portrait retouch app, and it’s still the best. Now available as version 3.0, it’s a powerful, professional package jam-packed with features, yet fast and easy – even for beginners. For Windows users, there’s a standalone version and a PhotoShop plugin, with Mac versions on the horizon. We’ll discuss here what some of those impressive features are and how to use them.
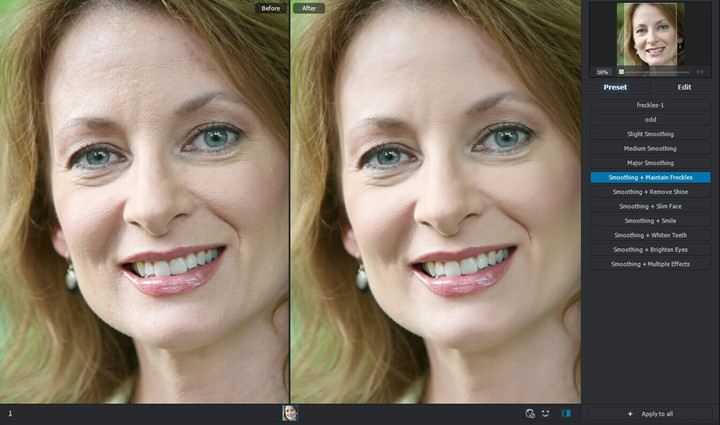
First and perhaps foremost, Portrait+ allows you to automatically apply pre-programmed edit settings to several or thousands of photos simultaneously. While many of the standard adjustments will often do just fine, things like skin smoothing and skin tone can be manually optimized almost as quickly and also applied to any or all selected portraits. Presets can be applied to all, or each face adjusted individually. P+ also detects up to 30 faces in a photo, 24 key points on each face, and all visible skin on each person. Because it’s hyper-efficient at applying so much to so many photos at once, it easily saves a ton of man-hours and therefore a ton of money for many professionals.

Virtually the entire program is self-explanatory and everything is clearly labelled, so just click on what you want. You can choose a sample photo provided for practice, but it’s just as easy to use your own to start: drag and drop to select one pic or an entire folder.
Although the auto-detection is quite accurate, it’s a good idea to check the facial points and defined skin area first to make sure they’re precise. Just click on the edit menu button along the top border, then on “adjust key points” or “adjust skin area.” Each facial point can be moved by “drag and drop,” and there is a thumbnail photo in the lower-right corner serving as a guide. The thumbnail has the equivalent individual point you’re adjusting highlighted by flashing red and blue. If you want to return to the original point placements, just click on “re-detect” underneath the demo thumbnail.

Zoom in and out using the sliding bar underneath the thumbnail in the upper right-hand corner. Below that you’ll see the “presets” button and the “edit” button. Below those two buttons you’ll first see the standard presets for skin, face slimming, teeth whitening, etc. Just choosing them one right after the other, the exact impact of each becomes immediately obvious. Many users find that Portrait+ allows a much more natural look automatically, without having to manually dial-back the effects – especially with skin. That said, you have total control and any changes can be as dramatic or as subtle as you want.
To do more hands-on editing, click on “edit.” You’ll see three categories: “Skin Magic,” “Enhancements,” and “Makeup.” Skin Magic in particular is aptly named, because aside from perhaps edit-intensive magazine layout work you can very quickly and very easily get as precise with skin tone and smoothing as you’d likely ever want to be, in a fraction of the time you might normally spend.
Use the toggle switches on the right-hand side to turn the individual features on or off, and to refine further simply single-click. Other items for adjustment under Enhancements are eye sizing, eye circle removal, cheek lifting, smile deepening, tooth whitening, and so on. Makeup options include blush, lipstick, eye colour, eyeliner, eye brow shape, etc. All can be adjusted for precise colour, tone, and intensity.

Note that as you edit a picture, your changes can be saved as a preset and then applied to any or all other photos (the “save as a preset” and “apply to all” buttons at the bottom of the vertical presets/editing bar on the right-hand side). Can you begin to see how this might save a little time? Other easy one-click actions include “before/after view”, “lock any faces to prevent them from being retouched,” (both to the right of the “apply to all” button, along with another “adjust key points” button) and “export” (below the “apply to all” button).

The screen-shot above clearly displays the batch exporting procedure: how the presets are easily applied, choosing pics and which folder they’re going to, selecting file formats, picture sizing and quality, and so on.
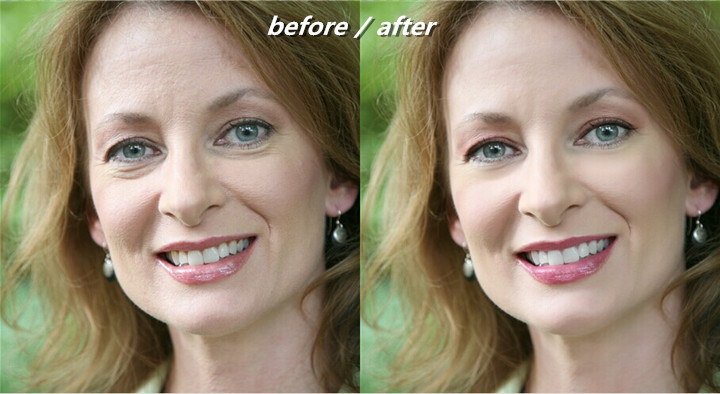
As you can see from below before and after photo, Portrait+ lives little to want. It’s a cinch to use despite being packed-to-the-gills with great features. Especially for first time use – the program is incredibly easy! Up, running and finished in no time.

[…] more about how to edit your portraits with their detailed tutorial now up on our tutorials […]